Did you know that driving with underinflated tires can reduce your fuel efficiency by up to 3%? That’s like throwing away a gallon of gas for every tank you use! Properly inflated tires not only save you money but also improve your vehicle’s safety and performance. In this comprehensive guide, we’ll walk you through the process of how to put air in tires at a gas station, ensuring you can maintain your tires with confidence and ease.
Gather Your Tools
Before heading to the gas station, it’s essential to have the right tools on hand. This preparation will make the process smoother and more efficient.
Tire Pressure Gauge
A tire pressure gauge is your most important tool when inflating tires. While many gas station air compressors have built-in gauges, they’re not always accurate. Having your own gauge ensures you get precise readings.
There are three main types of tire pressure gauges:
- Stick gauges: These are simple, affordable, and easy to use. They look like a pen and have a sliding indicator that shows the pressure reading.
- Digital gauges: These provide an exact digital readout, making them easy to read in any lighting condition. Many also have additional features like backlit displays or multiple measurement units.
- Dial gauges: These have a circular dial face, similar to a clock. They’re often more durable and can be more accurate than stick gauges, but they’re also bulkier.
When choosing a tire pressure gauge, consider factors like ease of use, durability, and accuracy. The Joes Racing Products Tire Pressure Gauge, for example, is highly accurate and even glows in the dark, making it easy to use in low-light conditions.
Valve Stem Caps
Valve stem caps are small but crucial components of your tire. They protect the valve stem from dirt, debris, and moisture that could otherwise enter and potentially cause air leaks. Before heading to the gas station, make sure you have all your valve stem caps. If you’ve lost any, it’s a good idea to purchase replacements.
When selecting valve stem caps, consider these options:
- Plastic caps: These are the most common and affordable. They’re lightweight and do a good job of keeping out debris.
- Metal caps: These are more durable than plastic caps and can provide a better seal. Some even come with special features like pressure indicators.
- Smart caps: These high-tech options can monitor your tire pressure and alert you when it’s low.
Remember, regardless of the type you choose, the most important thing is to always keep your valve stems capped to protect your tires’ air pressure.
Locate the Air Compressor
Once you’ve arrived at the gas station with your tools in hand, the next step is to find the air compressor. This can sometimes be trickier than you might expect, especially if you’re at an unfamiliar station.
Find the Air Compressor
Air compressors at gas stations are typically located in one of these areas:
- Near the gas pumps: Some stations have air compressors integrated into their fuel pump islands.
- Along the perimeter: Many stations place their air compressors along the edges of the property, often near vacuum stations or water dispensers.
- In a dedicated area: Larger stations might have a specific section for air and water services.
- Near the convenience store: Sometimes, the air compressor is located close to the main building.
If you’re having trouble locating the air compressor, don’t hesitate to ask a station attendant for help. They’ll be able to point you in the right direction.
When you find the compressor, take a moment to inspect it. Look for any signs of damage or malfunction. A well-maintained compressor will have:
- A clean, undamaged air hose
- A functioning pressure gauge (if equipped)
- Clear instructions for use
If the compressor appears to be in poor condition, it might be best to find another station to ensure you get accurate inflation.
Check for Payment Requirements
While some gas stations offer free air as a courtesy to their customers, many now charge for this service. Before you begin, check if there’s a payment requirement. Here are some common payment methods you might encounter:
- Coin-operated: These machines typically accept quarters. The amount can vary, but it’s usually between $0.50 to $1.50 for several minutes of air.
- Credit card payment: Some modern air compressors accept credit card payments, often with a flat fee for unlimited time.
- Token-operated: Some stations sell tokens that can be used in their air compressors.
- Free with fuel purchase: Some stations offer free air if you’ve purchased gas. You might need to ask the attendant to activate the compressor for you.
- Always free: Some states, like California, require gas stations to provide free air to customers who purchase gas.
If you’re unsure about the payment method or cost, check for instructions on the compressor itself or ask a station attendant. It’s always a good idea to have some quarters on hand just in case.
Remember, while paying for air might seem inconvenient, properly inflated tires can save you money in the long run through improved fuel efficiency and reduced tire wear. Consider it an investment in your vehicle’s health and your safety on the road.
Determine the Proper Tire Pressure
Before you start inflating your tires, it’s crucial to know the correct pressure for your specific vehicle. Using the right tire pressure ensures optimal performance, safety, and fuel efficiency. Here’s how to find the right pressure for your tires:
Check the Tire Pressure Label
The easiest and most accurate way to find your vehicle’s recommended tire pressure is to check the tire pressure label. This label is typically located in one of these places:
- Driver’s side door jamb: Open the driver’s door and look for a sticker on the door frame. This is the most common location for the tire pressure label.
- Inside the fuel door: Some manufacturers place the label inside the fuel filler door.
- Glove compartment: Occasionally, you might find the label inside the glove box.
- Rear passenger doors: In some vehicles, especially vans and SUVs, the label might be on one of the rear door jambs.
The label will show the recommended pressure for both front and rear tires, which may be different. It might also show different pressures for normal loads versus maximum loads.
For example, a typical passenger car might have a label that reads:
Front tires: 32 PSI
Rear tires: 32 PSI
Or for a vehicle with different front and rear pressures:
Front tires: 35 PSI
Rear tires: 33 PSI
Always use these recommended pressures, not the maximum pressure listed on the tire itself.
Consult the Owner’s Manual
If you can’t find the tire pressure label, your vehicle’s owner’s manual is the next best source. Look in the index for “Tires” or “Tire Pressure.” The manual will provide the recommended pressures and might offer additional information about maintaining your tires.
The owner’s manual might also provide different pressure recommendations for various conditions, such as:
- Normal driving
- Fully loaded vehicle
- High-speed driving
- Towing
Make sure to use the pressure that matches your typical driving conditions.
Check the Tire Sidewall
As a last resort, you can check the tire sidewall for the maximum pressure. However, it’s important to note that this is not the recommended pressure for your vehicle. The sidewall pressure is the maximum safe pressure for the tire, not the optimal pressure for your specific vehicle.
The sidewall will typically show something like:
Max Press. 44 PSI
Remember, inflating to this maximum pressure can lead to:
- A harsher ride
- Uneven tire wear
- Reduced traction, especially in wet conditions
Always aim to use the vehicle manufacturer’s recommended pressure rather than the maximum pressure listed on the tire.
By taking the time to find the correct tire pressure for your vehicle, you’re ensuring:
- Optimal fuel efficiency
- Even tire wear, extending the life of your tires
- Better handling and braking performance
- Reduced risk of tire failure
Remember, tire pressure can vary with temperature changes, so it’s a good idea to check your tire pressure monthly and before long trips. Now that you know the correct pressure, you’re ready to start inflating your tires.
Inflate Your Tires
Now that you’ve located the air compressor and know the correct tire pressure, it’s time to actually put air in your tires. This process is straightforward, but it’s important to do it correctly to ensure your tires are properly inflated.
Remove the Valve Stem Cap
The first step in inflating your tire is to remove the valve stem cap. Here’s how to do it:
- Locate the valve stem on your tire. It’s a small, cylindrical protrusion, usually made of metal or rubber.
- Unscrew the cap by turning it counterclockwise. It should come off easily with just your fingers.
- Place the cap somewhere safe where you won’t lose it. The top of the tire or your pocket are good options.
Remember, the valve stem cap plays an important role in keeping dirt and moisture out of your tire’s valve stem. Always make sure to replace it after inflating your tire.
If you find that the valve stem cap is stuck or difficult to remove, here are a few tips:
- Try using a pair of pliers, gently gripping the cap and turning counterclockwise.
- If it’s rusty, a bit of penetrating oil might help loosen it.
- If you can’t remove it or damage it in the process, don’t worry. You can purchase replacement caps at most auto parts stores.
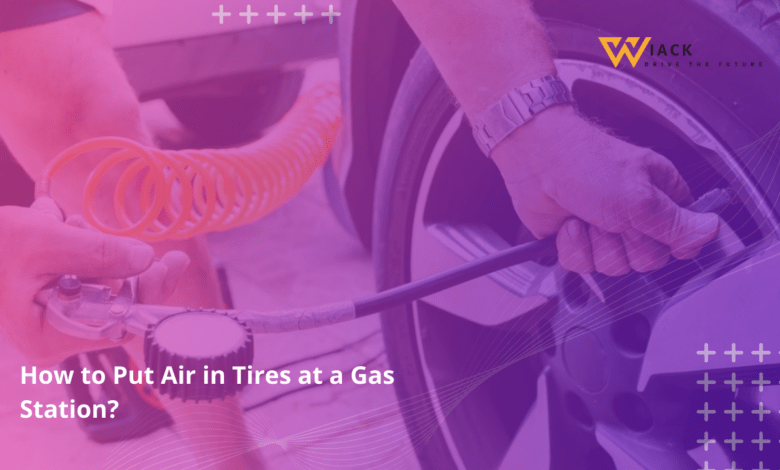
Connect the Air Hose
Once the valve stem cap is removed, you’re ready to connect the air hose. Follow these steps:
- Pick up the air hose from the compressor. Make sure it’s not tangled or kinked.
- Look at the end of the hose. You’ll see a fitting that’s designed to connect to your tire’s valve stem. It might have a lever or a button that you need to press to secure it to the valve stem.
- Press the fitting onto the valve stem firmly. You might hear a slight hiss of air as you do this – that’s normal.
- If the fitting has a lever, flip it down to lock it onto the valve stem. If it has a button, you might need to hold it down while inflating.
- Make sure the connection is secure. A poor connection can lead to air leakage and inaccurate pressure readings.
If you’re having trouble getting a good connection, try these troubleshooting steps:
- Check that the valve stem is clean and free from dirt or debris.
- Make sure you’re approaching the valve stem at the correct angle. Sometimes, especially with low-profile tires, the angle can be tricky.
- If the hose fitting is worn or damaged, let the station attendant know. They might have a replacement hose available.
Inflate to the Desired Pressure
Now you’re ready to start adding air to your tire. Here’s how to do it:
- If the compressor requires payment, insert your coins or credit card now.
- Turn on the compressor. This might involve pressing a button or flipping a switch.
- You should hear air flowing into your tire. Let it run for about 5-10 seconds.
- Stop the air flow and check the pressure with your personal tire gauge. Remember, the gauge on the compressor might not be accurate.
- If the pressure is still low, add more air in short bursts, checking frequently.
- If you accidentally overinflate, you can release air by pressing the small pin in the center of the valve stem with the back of your tire gauge or a small tool designed for this purpose.
- Continue this process until you reach the desired pressure.
Remember, it’s better to add air in small increments and check often rather than risk overinflating your tire.
Monitor the Pressure Gauge
While you’re inflating your tire, it’s crucial to keep a close eye on the pressure. Here’s why and how:
- Use your personal gauge: As mentioned earlier, the gauge on the gas station’s air compressor might not be accurate. Always rely on your own gauge for the most precise reading.
- Check frequently: Don’t just inflate continuously. Add air for a few seconds, then stop and check the pressure. This prevents overinflation.
- Be aware of temperature effects: If you’ve been driving for a while, your tires will be warm, which increases the pressure. The pressure you measure now might decrease slightly when the tires cool down.
- Adjust for current conditions: If you’re carrying a heavy load or planning a long highway trip, you might need to adjust your tire pressure slightly. Consult your owner’s manual for specific recommendations.
- Don’t trust your eyes: You can’t accurately judge tire pressure just by looking. Even a tire that looks fully inflated might be significantly underinflated.
Here’s a quick reference for what different pressure readings might mean:
| Pressure Reading | What It Means |
|---|---|
| Below recommended | Add more air |
| At recommended | Perfect! You’re done |
| 1-2 PSI over | Acceptable, but release a little air if possible |
| 3+ PSI over | Release air to avoid potential tire damage |
Remember, proper tire inflation is crucial for your safety, your vehicle’s performance, and your wallet. Taking the time to get it right is always worth the effort.
Finishing Touches
After you’ve successfully inflated your tires to the correct pressure, there are a few final steps to ensure everything is in order. These finishing touches are crucial for maintaining your tires and ensuring your safety on the road.
Replace the Valve Stem Cap
Once you’ve finished inflating your tire and have double-checked the pressure, it’s time to replace the valve stem cap. This small component plays a bigger role than you might think:
- Keeps out debris: The cap prevents dirt, dust, and moisture from entering the valve stem. This helps maintain the integrity of the valve and prevents air leaks.
- Indicates tampering: A missing cap could be a sign that someone has been messing with your tires.
- Provides a secondary seal: While the valve itself should prevent air from escaping, the cap provides an extra layer of protection.
Here’s how to properly replace the valve stem cap:
- Make sure the valve stem is clean. If there’s any dirt or debris, wipe it off with a clean cloth.
- Take the cap you removed earlier (or a new one if the original was damaged or lost).
- Place the cap on the valve stem and turn it clockwise until it’s finger-tight.
- Don’t overtighten – the cap doesn’t need to be extremely tight to do its job.
If you’ve lost a valve stem cap, don’t panic. You can purchase replacements at most auto parts stores or even some gas stations. They’re inexpensive and come in packs, so it’s a good idea to keep a few spares in your glove compartment.
Pay for Air (if applicable)
If you’re at a gas station that charges for air, now is the time to ensure you’ve paid for the service. Here are some common scenarios:
- Coin-operated machines: If you inserted coins at the beginning, you should be all set. If you needed more time than you initially paid for, make sure to add the additional coins.
- Credit card payment: If you swiped your card at the start, the machine should have automatically charged you. Double-check the display to ensure the transaction is complete.
- Token system: If the station uses tokens, make sure you’ve inserted the correct number of tokens for the time you used.
- Free with gas purchase: If air is supposed to be free with a gas purchase, confirm with the attendant that everything is squared away.
Remember, even if there’s a charge for air, it’s a small price to pay for the benefits of properly inflated tires:
- Improved fuel efficiency
- Better handling and safety
- Extended tire life
These benefits far outweigh the small cost of using the air compressor.
Double-Check Tire Pressure
Before you drive away, it’s a good idea to do one final check of your tire pressure. This serves several purposes:
- Ensures accuracy: It confirms that your initial readings and adjustments were correct.
- Checks for leaks: If you notice the pressure has dropped since you inflated the tire, there might be a slow leak that needs attention.
- Peace of mind: Knowing your tires are properly inflated before you hit the road can give you confidence in your vehicle’s safety and performance.
Here’s how to do this final check:
- Wait a few minutes after inflating. This allows the air in the tire to cool and settle, giving you a more accurate reading.
- Use your personal tire pressure gauge to check each tire again.
- Compare the readings to the recommended pressure you determined earlier.
- If any tire is significantly under or over the recommended pressure, adjust it again.
- Don’t forget to check your spare tire if your vehicle has one. It’s easy to overlook, but a properly inflated spare can be a lifesaver in an emergency.
If you consistently find that one tire loses pressure faster than the others, it might indicate a slow leak or other issue. In this case, it’s best to have the tire inspected by a professional as soon as possible.
Safety Tips
When learning how to put air in tires at a gas station, safety should always be your top priority. Here are some important safety tips to keep in mind:
Use Gloves
While it might seem unnecessary, wearing gloves when inflating your tires can be beneficial for several reasons:
- Protection from dirt and grime: Tires and air compressor hoses can be quite dirty. Gloves keep your hands clean.
- Improved grip: Some valve stem caps or compressor fittings can be slippery or difficult to handle. Gloves can provide better grip.
- Temperature protection: If you’ve been driving, your tires might be hot. Gloves protect your hands from the heat.
- Chemical protection: Tires are treated with various chemicals during manufacturing. Gloves prevent direct contact with these substances.
You don’t need special gloves for this task. Simple work gloves or even disposable nitrile gloves will do the job. Keep a pair in your car along with your tire pressure gauge for convenience.
Avoid Overinflation
Overinflating your tires can be just as dangerous as underinflation. Here’s why it’s crucial to avoid overinflation:
- Reduced traction: Overinflated tires have less contact with the road, reducing grip and increasing stopping distances.
- Uneven wear: The center of the tire bears more weight when overinflated, leading to faster wear in this area.
- Harsher ride: Overinflated tires don’t absorb road imperfections as well, resulting in a bumpier, less comfortable ride.
- Increased risk of damage: Overinflated tires are more susceptible to damage from potholes, curbs, and road debris.
To avoid overinflation:
- Always use a reliable pressure gauge to check your tire pressure.
- Add air in small increments, checking the pressure frequently.
- If you accidentally overinflate, release air immediately until you reach the correct pressure.
Remember, the maximum pressure listed on the tire sidewall is not the recommended pressure for your vehicle. Always use the pressure specified by your vehicle manufacturer.
Never Leave the Hose Unattended
When inflating your tires, it’s important to stay with the air hose at all times. Here’s why:
- Prevent overinflation: If left unattended, the compressor could inflate your tire well beyond the recommended pressure, potentially causing damage or even a blowout.
- Avoid accidents: An unsecured air hose can whip around unpredictably if it comes loose, potentially causing injury or damage.
- Be courteous: Other customers may be waiting to use the air compressor. Staying with your vehicle ensures you’re not taking up more time than necessary.
- Quick response: If something goes wrong (like a sudden leak or equipment malfunction), you’ll be there to address it immediately.
If you need to step away for any reason, turn off the compressor and disconnect the hose from your tire first.
Check Tire Pressure Regularly
Learning how to put air in tires at a gas station is an important skill, but it’s equally important to check your tire pressure regularly. Here’s why and how:
- Frequency: Check your tire pressure at least once a month and before any long trips.
- Best time to check: Check tire pressure when the tires are “cold” – meaning the car hasn’t been driven for at least three hours. This gives you the most accurate reading.
- Seasonal changes: Tire pressure can fluctuate with temperature changes. A drop of 10°F in temperature can lower tire pressure by 1-2 PSI.
- Visual inspections aren’t enough: A tire can lose up to half its air pressure and still appear normal. Always use a pressure gauge.
- Don’t forget the spare: If your vehicle has a spare tire, check its pressure too. You don’t want to discover a flat spare when you need it most.
Regular tire pressure checks can:
- Improve fuel efficiency
- Extend tire life
- Enhance vehicle handling and safety
- Provide early warning of slow leaks or valve problems
By incorporating these safety tips into your tire maintenance routine, you’ll not only extend the life of your tires but also ensure a safer driving experience for you and your passengers.
In conclusion, knowing how to put air in tires at a gas station is an essential skill for every driver. By following these steps and safety tips, you can ensure your tires are properly inflated, improving your vehicle’s performance, safety, and fuel efficiency. Remember, a few minutes spent maintaining your tires can save you money, enhance your safety, and give you peace of mind on the road. So the next time you see that air compressor at the gas station, you’ll be fully prepared to give your tires the care they need.
Get the latest car news, reviews, and prices at Wiack.com. Your one-stop destination for all things automotive.